Welcome back!
Ready to check out?
You're just one click away from fantastic style and even better savings!
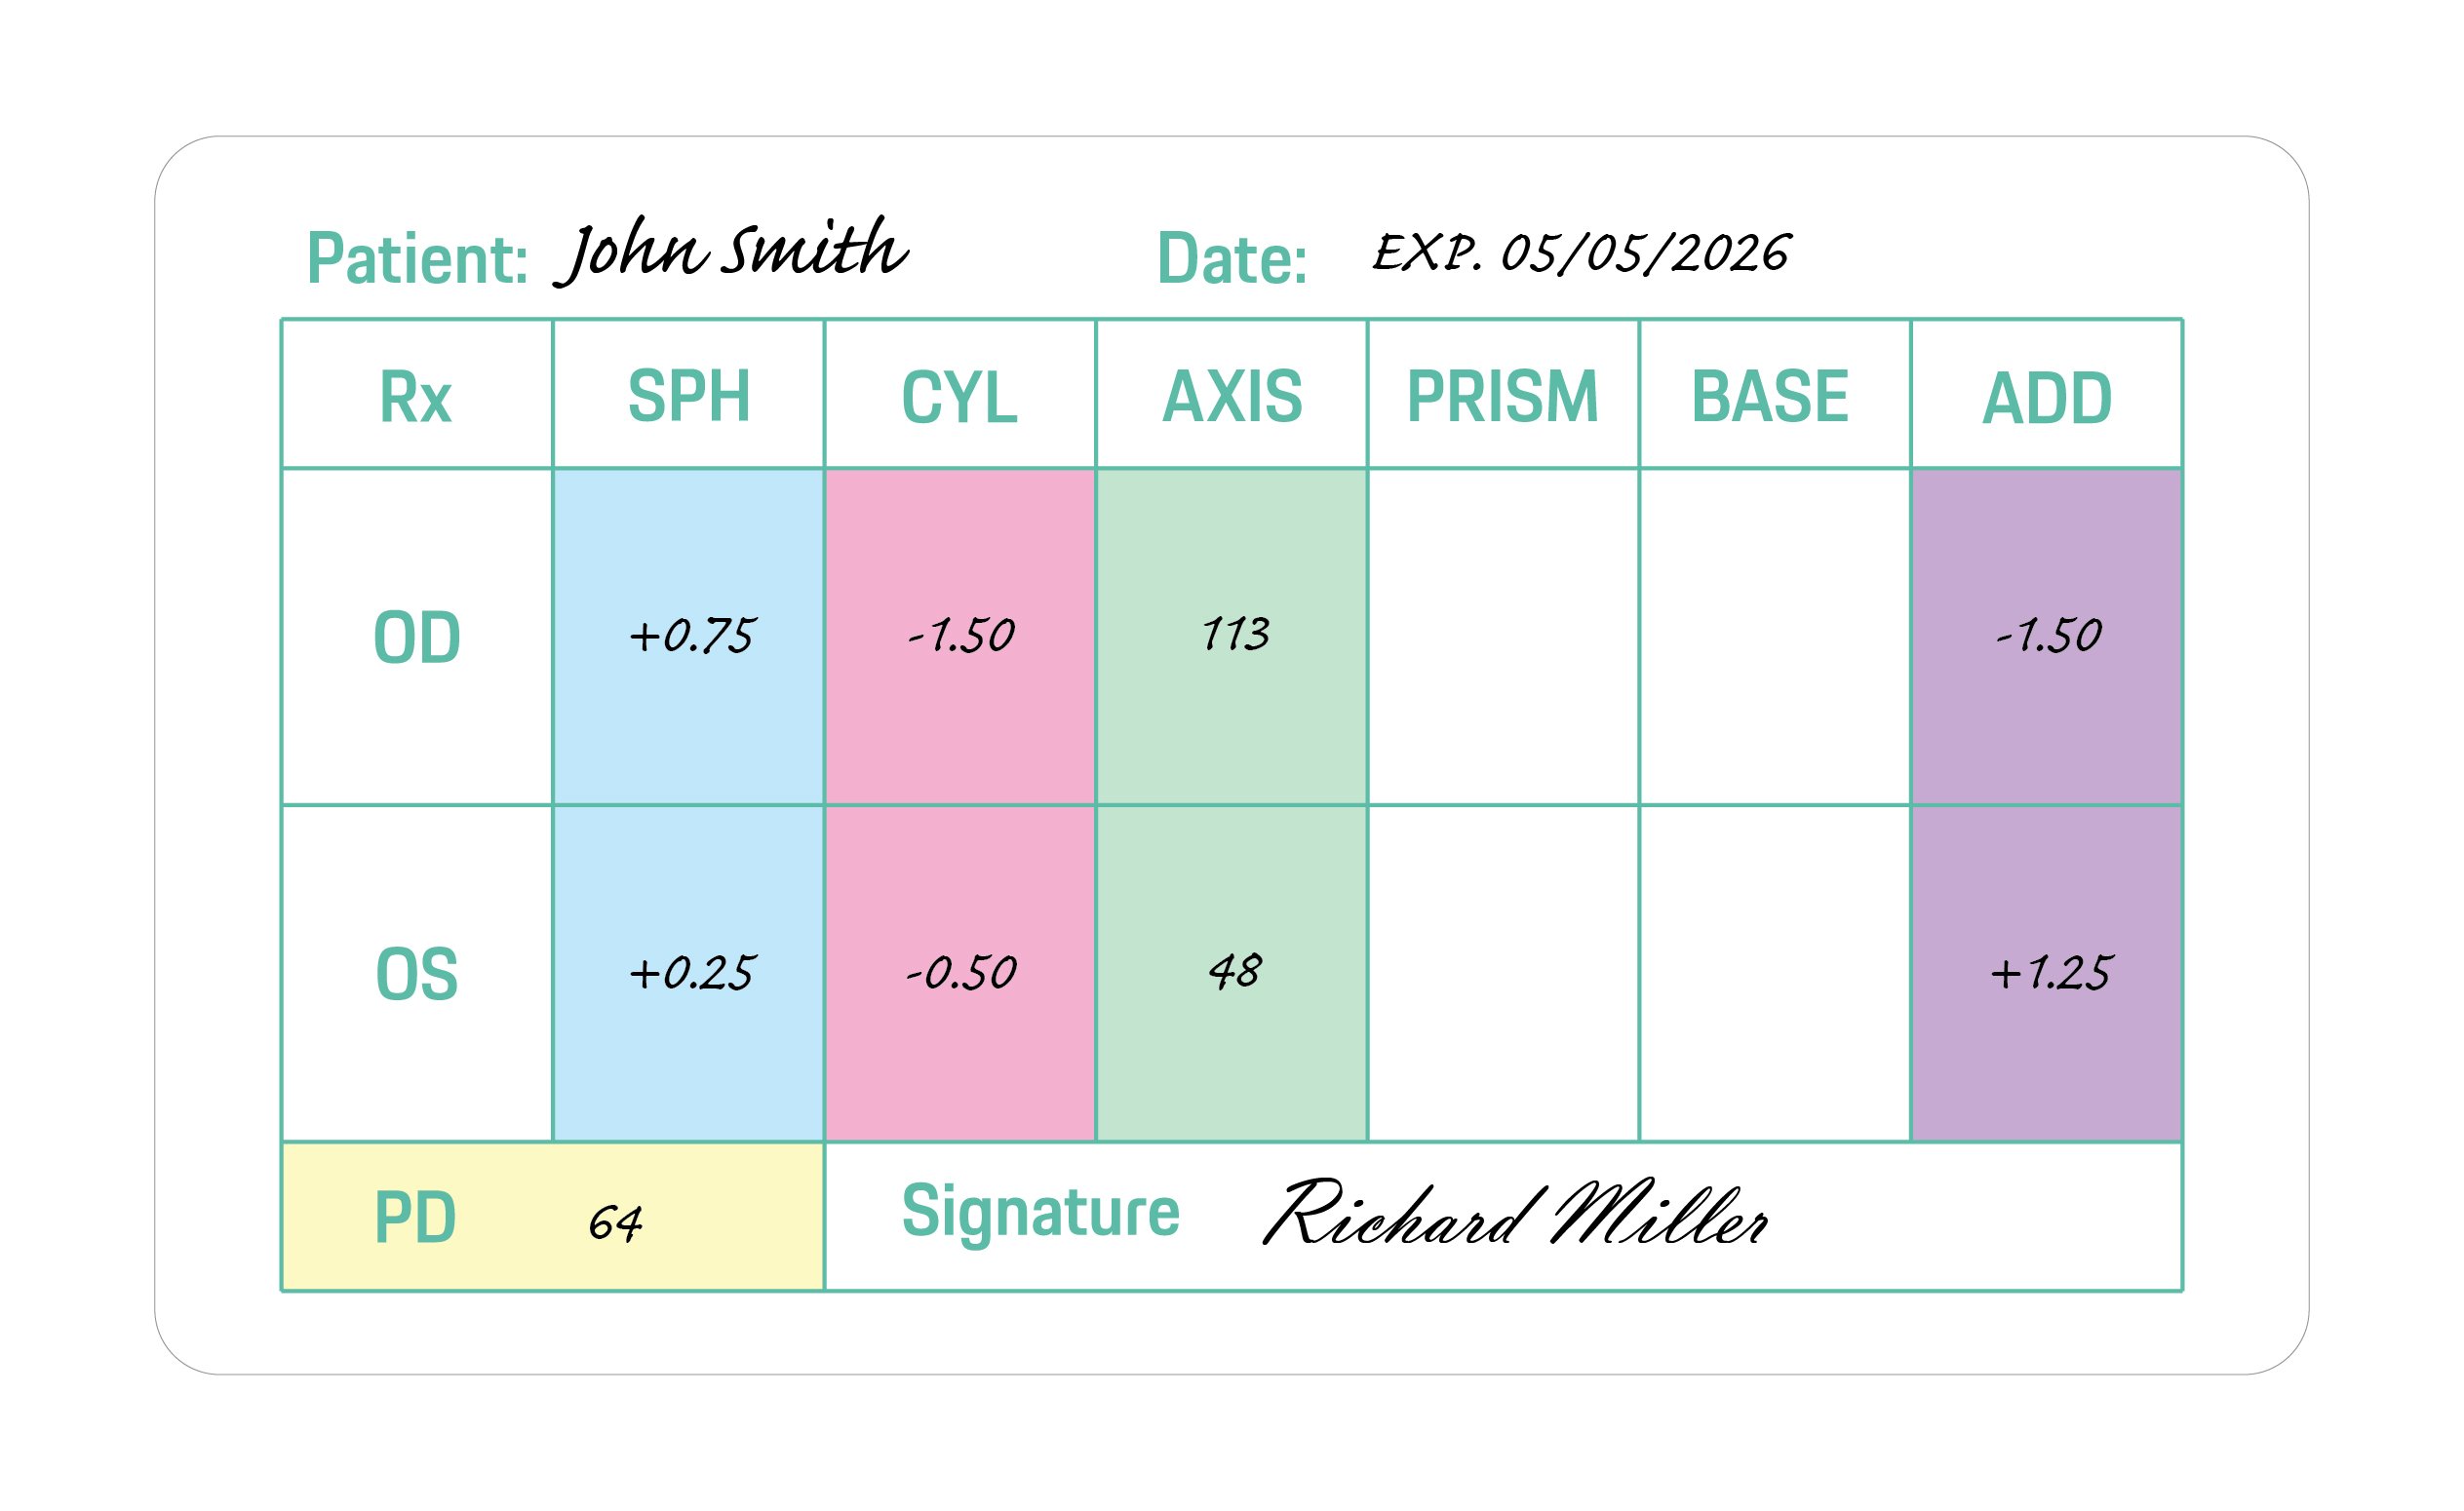
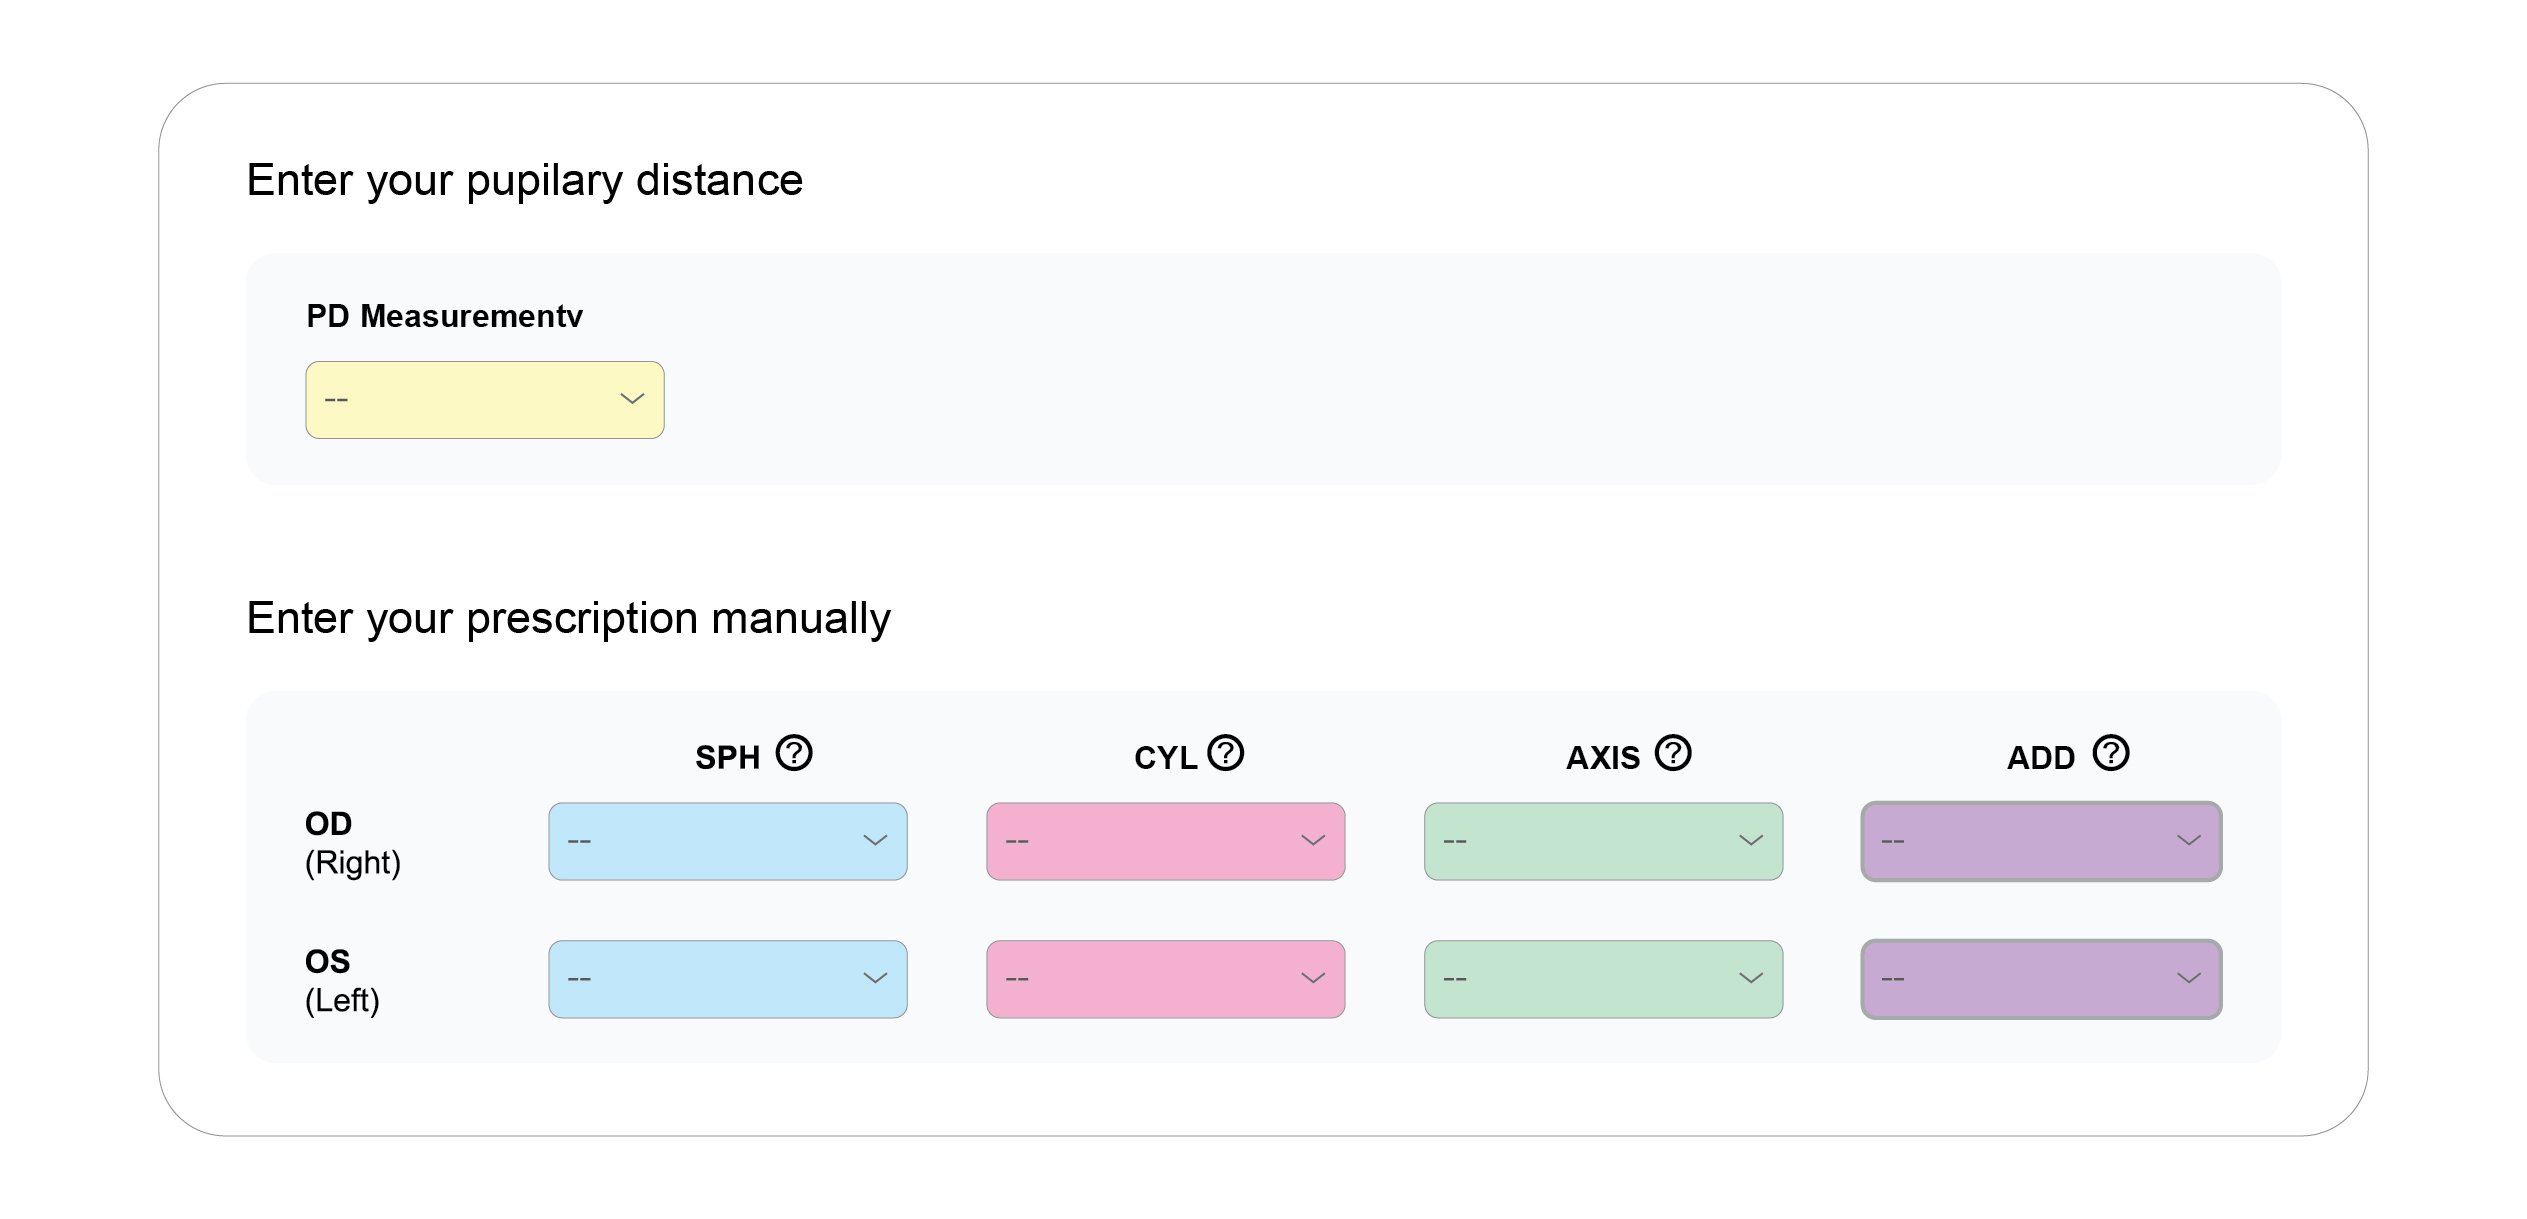
OD is an abbreviation for the Latin term oculus dexter which means right eye. Notice that the right eye information is asked for first even though we typically read from left to right.
OS is an abbreviation of the Latin oculus sinister which means left eye. That will be referenced on the far right column of the prescription.
SPH is short for sphere. The sphere of your prescription indicates the power on the lenses that is needed to see clearly. A plus (+) symbol indicates the eyeglass wearer is farsighted. A minus (-) symbol indicates that the eyeglass wearer is nearsighted.
CYL is short for cylinder. The cylinder indicates the lens power necessary to correct astigmatism. If the column has no value (is blank), it indicates that the eyeglass wearer does not have astigmatism. If this is the case on your prescription, you can leave it blank when entering it in.
AXIS is a prescription will include an axis value for those with astigmatism. This number represents the angle of the lens that shouldn't feature a cylinder power to help correct your astigmatism.
ADD is short for "additional correction." This is where details about bifocals, multifocal lenses or progressive lenses would appear.
If you see a file named Resident Evil 4.ppsspp or RE4.iso claiming to be for PPSSPP, it is :
Before you can start playing, you'll need a few things. Here's a step-by-step guide to get you started:
While the PS2 and Wii versions offered extras, the PSP port (often repacked for custom firmware) allows for true portable play. The PPSSPP emulator enhances the original PSP hardware limitations, offering: download top game resident evil 4 ppsspp
user wants a long article for the keyword "download top game resident evil 4 ppsspp". This is a guide for downloading and playing Resident Evil 4 on the PPSSPP emulator. I need to search for relevant information: PPSSPP emulator details, Resident Evil 4 on PSP, ISOs, textures, settings, and troubleshooting. I'll conduct multiple searches to cover these areas. search results provide some relevant pages. I will open several to gather comprehensive information. have gathered information from various sources. Now I need to write a comprehensive article. The article should cover: introduction to Resident Evil 4 and PPSSPP, game features, how to download and install PPSSPP, where to find the ISO, settings optimization, gameplay tips, troubleshooting, and conclusion. I'll structure it accordingly. you want to experience the survival-horror masterpiece on your Android phone or PC using the powerful PPSSPP emulator , you have come to the right place. This comprehensive guide will walk you through everything you need to know, from downloading the latest version of PPSSPP to optimizing the perfect graphic settings for a smooth, high-definition experience.
Navigate through the emulator's built-in file manager to the folder where you saved the Resident Evil 4.iso file. Tap the Resident Evil 4 game icon to launch the game. Best PPSSPP Settings for Smooth Gameplay If you see a file named Resident Evil 4
If you are looking to , it is important to know that Capcom never officially released Resident Evil 4 for the PlayStation Portable (PSP). However, the gaming community has created fan-made "PPSSPP" versions, which are often modified versions of other games like Syphon Filter or Tenchu with Resident Evil 4 skins and assets. The Reality of Resident Evil 4 on PPSSPP
Locate your downloaded Resident Evil 4 PPSSPP zip archive using ZArchiver. Tap the file and select or extract it to a dedicated folder named "PSP Games". This will yield a large .iso or .cso file. Step 3: Install Textures and Save Data This is a guide for downloading and playing
Graphics & Presentation
If you experience lagging, audio crackling, or black screens, tweak your emulator settings to optimize performance. Graphics Settings
At least 2GB of free space for the ISO file and save data. Required Software
Do you plan to use or an external controller ? Share public link
*Discount applied on the current website price at the time of order. Offer only valid for new customer first contacts order over $10. Maximum discount of $100. Cannot be combined with any other offers. Promotions are subject to change without notice. We reserve the right to cancel orders that are in breach of the terms and conditions of this offer.


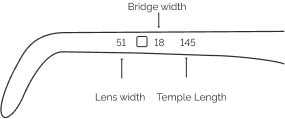
| Lens Width | Bridge Width | Temple Length | |
|---|---|---|---|
| XS | < 42 mm | < 16 mm | <=128 mm |
| S | 42 mm - 48 mm | 16 mm - 17 mm | 128 mm - 134 mm |
| M | 49 mm - 52 mm | 18 mm - 19 mm | 135 mm - 141 mm |
| L | >52 mm | >19 mm | >= 141 mm |
Buying eyewear should leave you happy and good-looking. Use our sizing tool to find frames that best fit your unique facial measurements.
Grab a regular card with a magnetic stripe on the back. Student IDs, credit cards and gift cards work well to start our online PD tool.
You may have received our paper PD measurement tool in your recent online order. In order to use this tool, place the ruler on your eyes so that the "0" lines up at the centre in between your eyes. Add up the two numbers, to get your PD. See example below:
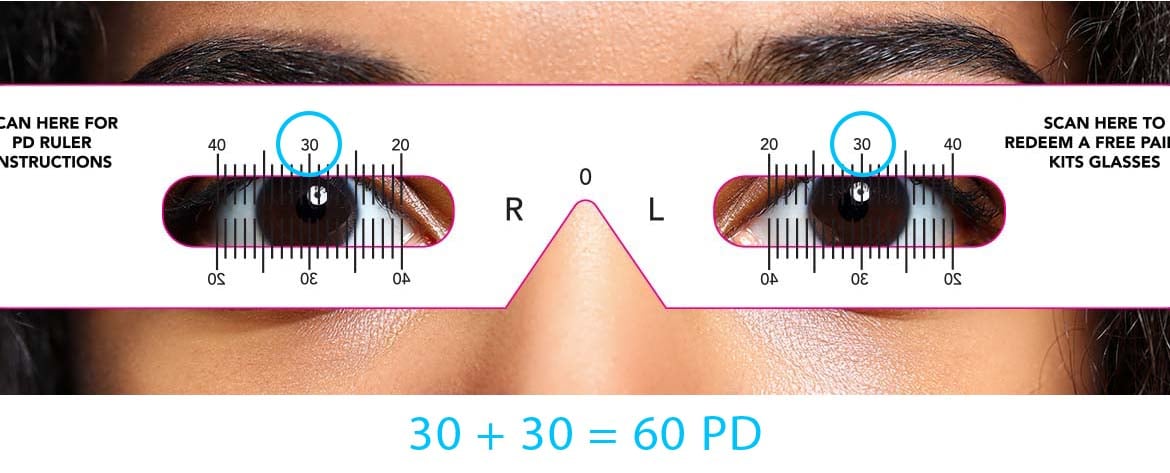
Click on this link to download and print your own PD measurement tool.
DOWNLOAD