
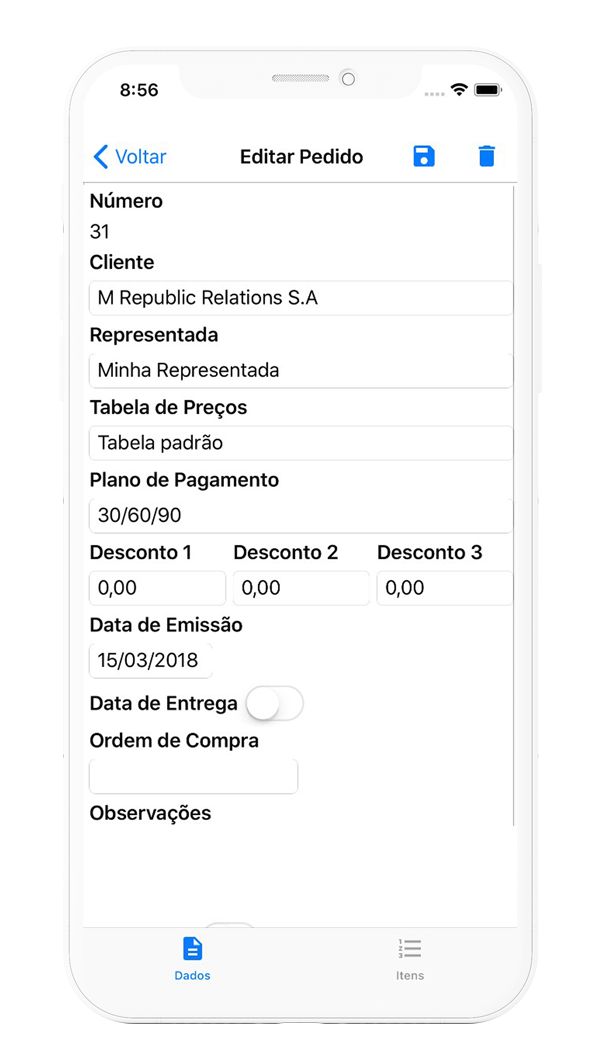
Pedido Mobile
Lifetime Basketball Hoop Assembly Cb14500 File
Emissão de pedidos, relatórios, comissões, controle de estoque e muito mais.
Surpreenda seus clientes na hora de vender.
Emissão de pedidos, relatórios, comissões, controle de estoque e muito mais.
Surpreenda seus clientes na hora de vender.
Disponível para iOS, Android e Windows 10
Lay the backboard face down on a soft surface (like the cardboard box) to prevent scratching. Attach the mounting brackets and the Slam-It Pro Rim.
Tighten these bolts until they are snug, but do not over-torque them. The arms must be able to pivot when you adjust the hoop height later. Step 4: Mounting the Backboard and Rim
To extend the lifespan of your Lifetime CB14500, conduct routine checks every three months:
A portable hoop is only safe if it is properly weighted. Never allow anyone to play on the hoop before completing this step. Option A: Water (Easy but Risky)
This comprehensive guide breaks down the entire assembly process for the Lifetime CB14500, offering pro tips, safety warnings, and troubleshooting advice to get your system upright and ready for game day. 1. Pre-Assembly Preparation
Select a flat, level surface (concrete driveway or patio) close to where the final assembly will be located.
This is where the structure of your hoop comes together.
Keep the hardware in its original packaging until the manual instructs you to open it.
The successful setup of a requires careful attention to safety and stability. Prioritizing correct ballast and following all safety warnings ensures a secure environment for physical activity. Additional Resources:
Lay the backboard face down on a soft surface (like the cardboard box) to prevent scratching. Attach the mounting brackets and the Slam-It Pro Rim.
Tighten these bolts until they are snug, but do not over-torque them. The arms must be able to pivot when you adjust the hoop height later. Step 4: Mounting the Backboard and Rim
To extend the lifespan of your Lifetime CB14500, conduct routine checks every three months: lifetime basketball hoop assembly cb14500
A portable hoop is only safe if it is properly weighted. Never allow anyone to play on the hoop before completing this step. Option A: Water (Easy but Risky)
This comprehensive guide breaks down the entire assembly process for the Lifetime CB14500, offering pro tips, safety warnings, and troubleshooting advice to get your system upright and ready for game day. 1. Pre-Assembly Preparation Lay the backboard face down on a soft
Select a flat, level surface (concrete driveway or patio) close to where the final assembly will be located.
This is where the structure of your hoop comes together. The arms must be able to pivot when
Keep the hardware in its original packaging until the manual instructs you to open it.
The successful setup of a requires careful attention to safety and stability. Prioritizing correct ballast and following all safety warnings ensures a secure environment for physical activity. Additional Resources:
Oferecemos 7 dias gratuitos para testes, aproveite!
Disponível para iOS, Android e Windows 10